Editor's note: This text-based course is a transcript of the webinar, Optimizing Core Retraining, Part 2, presented by Jennifer Stone, PT, DPT, OCS, PHC, TPS, HLC.
*Please also use the handout with this text course to supplement the material.
Learning Outcomes
- After this course, participants will be able to analyze the diastasis rectus abdominus.
- After this course, participants will be able to apply at least three options for the use of manual therapy to provide a neuromotor reset to the core to support occupations.
- After this course, participants will be able to evaluate at least three examples of motor control retraining for patients, including optimal methods to progress motor control for various patient types and activities.
Introduction
Thank you so much. I'm excited to be back and share part two of this lecture. If you missed part one, don’t worry—you can always go back and watch it later. I’ll provide a quick review so you won’t feel lost today.
For those returning from part one or watching this after completing the first session, I know the initial lecture might have felt like a bit of a teaser. We spent a lot of time discussing the core, how to evaluate it, and the foundational concepts behind it. Naturally, as therapists, our minds immediately jump to the next step—how do we apply this knowledge in practice? How do we help our patients with the issues we've now learned to assess and understand?
That’s exactly what today is all about—what comes next. Let’s dive in.
Quick Review of Part 1
Here's a quick review of part one. I won’t be repeating everything in detail since the full session is available for you to revisit, but I want to highlight the key points to set the stage for today’s discussion.
Part one focused on understanding the core as a dynamic movement system. It’s not a single muscle or even a single group of muscles, and it doesn’t function by simply squeezing and holding. Instead, it’s a constantly mobile system that coordinates with other muscles to support movement. Because of this, we emphasized the importance of using functional movement assessment. Since the core is an active and adaptable system, we can’t fully understand what it’s doing without observing people in motion and analyzing their motor control patterns.
We also discussed the "floor to ceiling" concept—the diaphragm as the ceiling, the pelvic floor as the floor, and the torso wrapping 360 degrees around the walls of the container. All these components must work together in a coordinated fashion to optimize movement.
Another major topic was intra-abdominal pressure. This pressure system, created within the floor-to-ceiling structure, generates support—sometimes called stability- though I have mixed feelings about that term. We explored how this system must adjust dynamically depending on the task. Whether reaching for a coffee cup, picking up a grocery bag, or lifting a heavy weight at the gym, the core should engage at different levels depending on the movement's demands.
Finally, we touched on the anticipatory nature of core activation. Research shows that the core doesn’t just engage during movement—it fires in anticipation of movement, preparing the body before an action begins. Today’s discussion will focus on how to help people retrain these core functions, optimizing movement and support across different activities.
Diastasis Rectus Abdominus
Let’s take some time to dive a little deeper into the diastasis rectus.
I briefly mentioned this at the end of part one, but I want to expand on it here since I only provided a preview last time. This specific condition affects the core, particularly a person's ability to generate and control intra-abdominal pressure. It’s more common across various patient populations than many might realize, so I want to provide a quick overview before we discuss specific retraining and rehabilitation strategies later on.
To start, let’s define diastasis rectus. This condition involves a separation of the rectus abdominis muscles along the linea alba, leading to a loss of optimal tension and coordination within the core system. Understanding this concept visually can be particularly helpful, and this image illustrates it well (Figure 1).
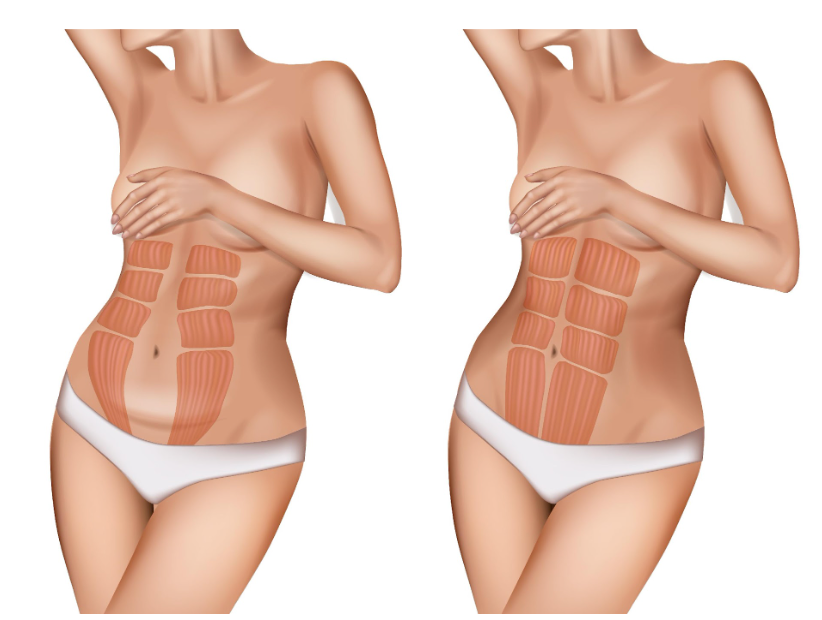
Figure 1. Diastasis rectus abdominus.
The linea alba is a thick band of fascia running straight down the middle of the abdomen, connecting the two sides of the rectus abdominis. While pregnancy is a common cause of changes to this structure, it is not the only reason it can be affected. Sometimes, the linea alba can become overstretched or tear, leading to the rectus muscles drifting outward.
Since these muscles generate movement by pulling the ribcage toward the pelvis, any disruption in their ability to transfer force across the midline can interfere with intra-abdominal pressure control. Instead of effectively generating and maintaining this pressure for support, the body experiences what can be likened to a "leak in a tire." The core attempts to create the necessary intra-abdominal pressure, but because there is a weakness or gap in the abdominal region, the support system is compromised. In response, the body tries to generate even more pressure to compensate, which further exacerbates the issue, creating a cycle that can be difficult to break.
Diastasis rectus is most commonly seen in postpartum individuals, even years after giving birth. Research shows that approximately 96% of individuals have diastasis by the second day postpartum. This is considered a normal adaptation to pregnancy, allowing for the necessary expansion of the abdomen. However, by 12 weeks postpartum, this number drops to about 35%, depending on the study. Those who continue to have diastasis beyond this period are unlikely to experience spontaneous resolution without targeted rehabilitation. If left unaddressed, it can contribute to conditions such as low back pain and other issues related to suboptimal core motor control, including pelvic organ prolapse and pelvic pain.
Aside from postpartum individuals, diastasis rectus is also prevalent in other populations. Individuals who have undergone significant and rapid weight loss, such as those who have had bariatric surgery, are at risk, particularly if a hernia is also present. Additionally, high-impact athletes and heavy lifters who frequently use a Valsalva maneuver can develop diastasis over time due to repeated increases in intra-abdominal pressure. It is also common among older men with an "apple-shaped" body type, where the abdominal wall is placed under chronic stress. In these cases, a visible "coning" or "tenting" of the midline occurs during movement, forming a noticeable bulge rather than the expected abdominal tension. If this is observed in any patient, it clearly indicates diastasis rectus.
In rare cases, diastasis rectus can develop acutely. One example was a 45-year-old patient who experienced a sudden "unzipping" sensation in his midline while chopping wood. He had sustained an acute tear of the linea alba, which resulted in severe diastasis. While rehabilitation is often effective for overstretched tissues, his case ultimately required surgical intervention due to the extent of the injury.
A great question is whether prolonged diastasis often increases the risk of hip labral tears. The short answer is yes. When the core lacks optimal support, the body finds alternative ways to stabilize and move. While this adaptability is essential for function, prolonged reliance on compensatory movement strategies places excess strain on structures not designed to handle those demands. Over time, this can increase the risk of overuse injuries, including hip labral tears. Athletes with suboptimal motor control strategies are particularly vulnerable to soft tissue injuries, such as ACL tears and labral damage, due to their increased movement demands.
The standard test for assessing diastasis rectus involves placing the patient in a hook-lying position. The patient is asked to lift their head and shoulders while reaching toward their feet, engaging the abdominal muscles. The clinician then palpates the midline with their fingers. If the fingers sink into a noticeable gap between the rectus abdominis muscle bellies, this indicates a diastasis. The severity of the condition varies, and while some cases are mild, even a moderate diastasis can contribute to significant functional challenges.
Testing
The way we measure diastasis rectus may not sound highly scientific, but it has been validated in clinical practice. While it does not have strong inter-rater reliability, its intra-rater reliability is quite good. This means the results remain fairly consistent as long as the same clinician performs the initial test and any follow-up assessments.
Clinically, we assess diastasis by determining how many fingers fit into the gap between the rectus abdominis muscles and how deep the fingers sink into that gap. While ultrasound can provide precise measurements—something I have used in research settings—most clinicians do not have access to ultrasound technology in their daily practice. If an ultrasound is available, it can certainly be used for additional insight, but the manual assessment remains a practical and reliable method.
A separation of about one to one and a half fingers wide is considered normal and may either resolve spontaneously or reflect the individual's natural tissue structure. Some degree of indentation between the muscle bellies is expected due to the fascial connection at the midline. However, if the separation is greater than one and a half fingers—particularly if it reaches two fingers or more—and is accompanied by a visible bulging or coning when the patient lifts their head and shoulders or performs other core movements, this confirms the presence of a diastasis. In such cases, special precautions may be warranted.
Depth is another important factor to assess. For example, in one case I mentioned, the diastasis measured about three fingers wide, but the depth only extended to about the first knuckle or slightly less. This distinction is important because a wider separation does not necessarily indicate a severe case if the connective tissue still provides some tension and support. Understanding both width and depth helps guide intervention and determine the most appropriate course of treatment.
Figure 2 shows an example.
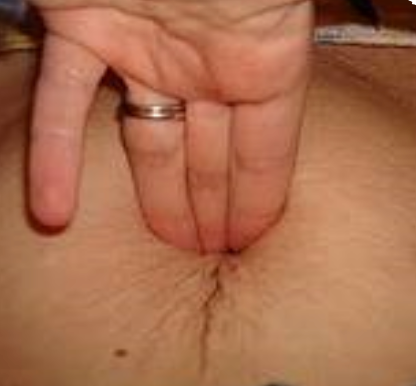
Figure 2. Example of testing a diastasis rectus abdominus.
I don’t recall exactly how far I could sink into the gap in this particular case since it’s been many years since I took this picture. However, depth is a much more important prognostic factor than width when considering how well someone will respond to rehabilitation.
I have assessed diastases where I could sink my fingers to the point where it almost felt like I was palpating the person’s spine through their abdomen. In contrast, this case only extends to about the first knuckle, which suggests a much better prognosis for rehabilitation.
When measuring diastasis, I assess it in three locations. First, at the level of the umbilicus—though not directly in the belly button, but just slightly above it. In this position, the umbilicus would be on the other side of my fingers. Then, I measure about halfway between the umbilicus and the pubic symphysis and, finally, about halfway between the umbilicus and the xiphoid process.
There are specific validated measurement positions for research purposes, and when conducting research on diastasis, I used a measuring tape to take exact measurements. However, from a clinical perspective, this precision level is unnecessary. Clinically, it’s perfectly acceptable to estimate these locations visually.
Core Reset: Manual Therapy to Facilitate Motor Control Retraining
Once we’ve completed the evaluation and identified suboptimal motor strategies, the next step is to figure out how to help patients optimize their movement patterns.
As with anything in therapy, the answer is—it depends. The approach depends on what was found during the evaluation, but just as importantly, it depends on how the patient responds to intervention and what other contributing factors may be at play.
I want to take a moment to acknowledge that while we focused on assessing the core in the previous session, I didn’t spend much time discussing how to assess the spine, hips, or other related structures. That was intentional—not only because I assume many of you already have some familiarity with those areas but also because this series is centered on core functions. Even the most thorough core evaluation should never be viewed in isolation. It must be considered in the entire assessment, incorporating the alignment and function of related bony structures, muscle coordination, and movement strategies.
I truly love therapy's ability to take all these pieces, analyze how they interact, and craft an individualized treatment approach that makes sense for each patient. It’s the art of blending clinical reasoning with movement science to develop a strategy that promotes better function and long-term success.
Neuromotor Control/Reset
Now, let’s talk about some manual therapy techniques we can use to facilitate motor control retraining.
What does manual therapy do? When I was in school—which was quite a while ago, so I’m going to date myself a little here—I was taught that manual therapy involved physically moving joints, restoring motion using our hands, stretching or breaking up scar tissue, and mechanically remodeling tissue. Many of you may have been taught the same in your entry-level education.
However, recent research has shown that manual therapy is actually a neuromotor input tool. Rather than purely being a mechanical intervention, manual therapy influences the nervous system by altering the sensory input sent from the body to the brain. This, in turn, prompts the brain to pay attention to an area that may not be functioning optimally, allowing it to adjust movement patterns accordingly. Essentially, the brain modifies tissue behavior, movement, and even perception of tension or restriction—not just our hands.
That’s not to say that manual therapy never causes mechanical tissue changes, but much of its benefit seems to come from what I like to think of as hitting "Control-Alt-Delete." Now, feel free to laugh for those who are far more tech-savvy than I am—I won’t take offense. My primary troubleshooting strategy for any computer issue is to turn it off and turn it back on. And the funny thing is, it often works. When I do call IT, their first question is always, “Did you try restarting it?”
From what I understand, restarting a computer halts all the background processes, clearing out whatever is stuck and allowing the system to function more smoothly. Our bodies work in a similar way. At any given time, thousands of subconscious processes are happening in the background. When we use manual therapy to disrupt a habitual movement pattern, we pause the system, allowing us to retrain the motor control strategy more effectively—like performing a software reboot.
So, where does manual therapy belong in a treatment session? As always, the answer is—it depends. If the goal is to help a patient relearn movement patterns, manual therapy is best done before exercise to reset the system and allow for more effective motor retraining. If it’s primarily being used for pain relief, there’s a case for doing it at the end of the session. In some cases, I might even incorporate manual therapy both before and after exercise, depending on the patient’s response. There’s no single correct answer, but the key is to let the goal of the intervention guide when and how you use it.
For those wondering about research supporting the neuromotor benefits of manual therapy, there’s a wealth of literature on the subject. Many relevant studies are included in your reference list, but if you’d like specific links, feel free to email me. My contact information is in the handout, and I’ll be happy to share additional resources.
Motor Control
I’ve been talking a lot about motor control—how we assess it, how we retrain it—but what exactly is motor control?
To keep this explanation practical, I’ll simplify it a bit in Figure 3. For those with a deep background in neurophysiology, I recognize this is an oversimplification, but for this discussion, I think this framework helps make the concept more accessible.
At its core, motor control is the process that allows us to decide whether to perform an action and then successfully execute it. It involves a complex interaction between the brain, nervous system, muscles, and sensory feedback systems to coordinate movement efficiently and effectively.
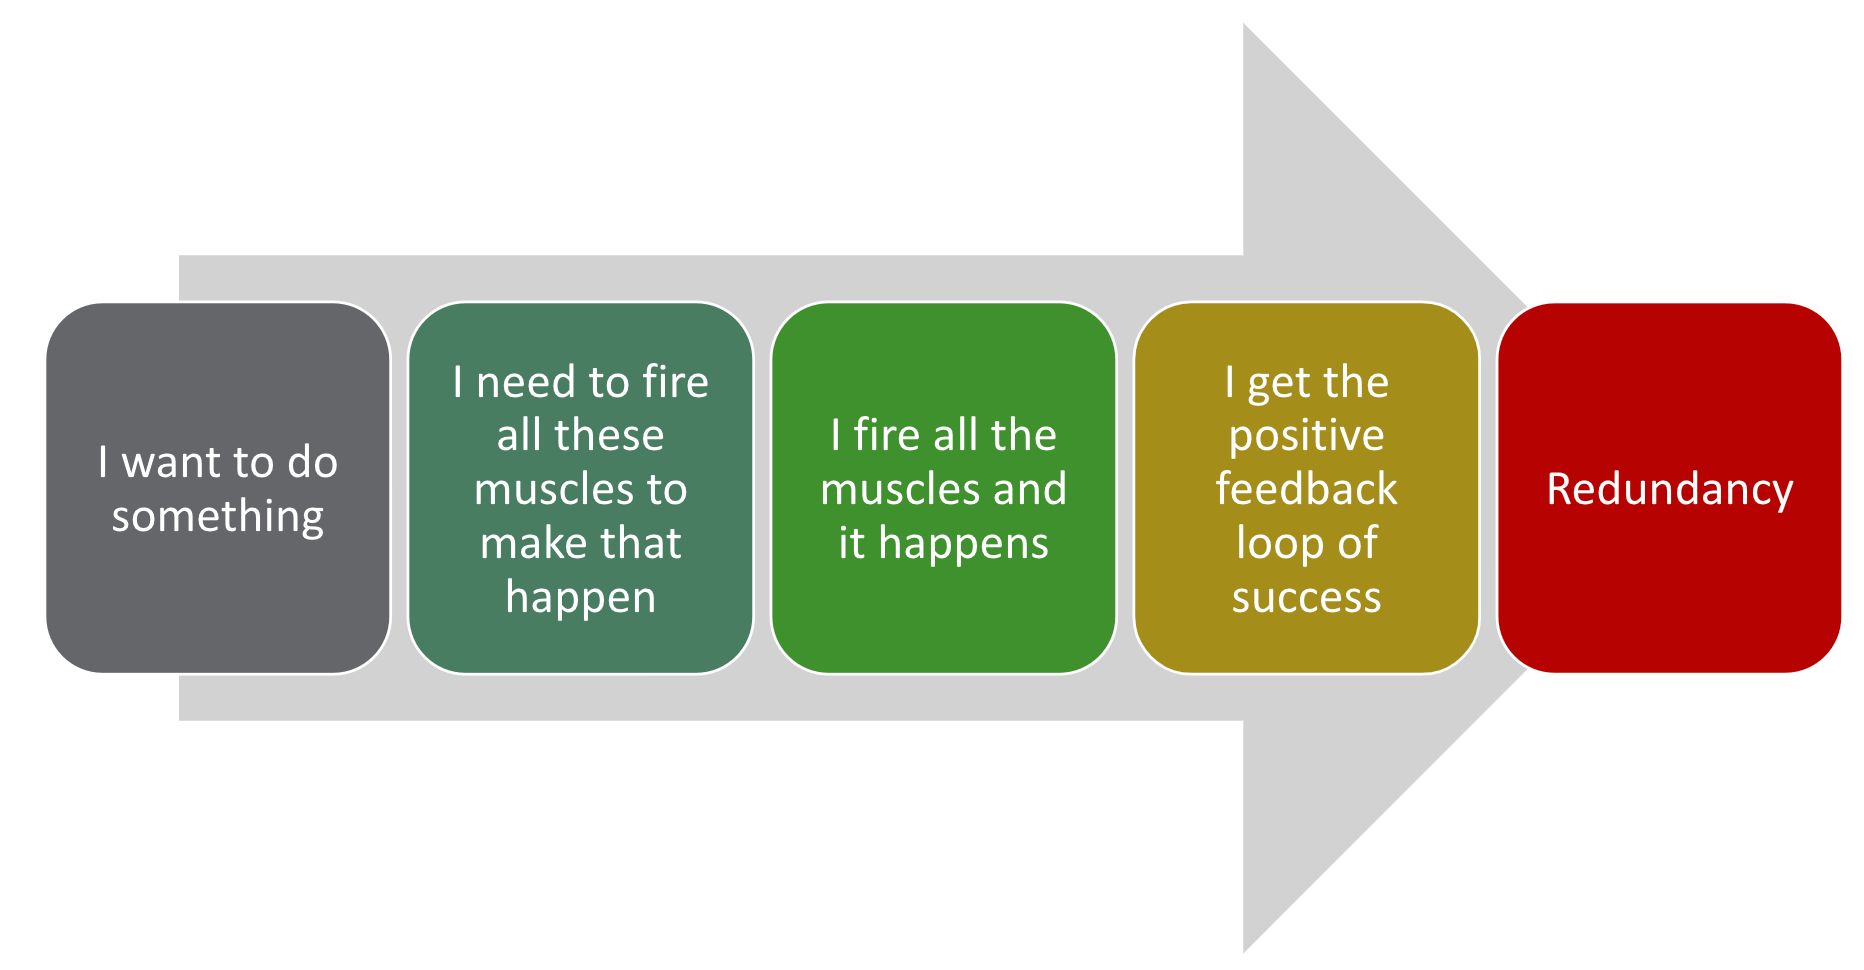
Figure 3. Overview of motor control.
Let’s use a simple example—opening a door.
When I decide to open a door, my brain immediately shifts into planning mode. This happens almost entirely at a subconscious level unless it's an unfamiliar motion, in which case I may consciously think through the steps. Typically, though, this process is automatic.
In a fraction of a second, my brain determines what needs to happen. It identifies the muscles that need to fire and in what sequence. It processes visual information to locate the door handle, coordinates the necessary movements, and then executes them—I reach, grasp, turn, and pull.
Once the action is completed, a positive feedback loop reinforces the success. The door opened, confirming that the motor plan worked.
Over time, with repeated practice, this movement becomes second nature. I’ve been opening doors for most of my life—at least since I learned how as a toddler—so my brain has developed an efficient motor plan. When I approach a door, my nervous system automatically follows a well-established motor pathway. The train runs down the track without me needing to think through each step consciously.
Redundancy
This concept is called redundancy. Redundancy means you don’t have to consciously think about walking, opening a door, or brushing your teeth. You may not even remember specific instances of doing these tasks because your brain has developed motor control pathways that automate frequently performed movements.
This is a good thing. If we had to consciously focus on every breath we took or every step we made, we wouldn’t have the mental capacity to do much else. Automation allows us to function efficiently, conserving cognitive resources for more complex tasks.
When we attempt something new and complicated, we must think through every move— like the first time I went rock climbing. Where do I put my foot? How much force do I need to push myself up? Each step required conscious effort. But if I rock climbed regularly, my brain would eventually automate much of the process. Only particularly difficult movements would require my conscious attention.
Motor control is essentially the process of developing and refining movement strategies through repetition. Once a movement becomes redundant, the brain doesn’t need to process every step. Instead, it functions like a switchboard operator, automatically recognizing the pattern and activating the established motor pathway.
So why does redundancy matter? While it allows for efficiency, there’s also a downside. Because motor control relies on both the sensory and motor cortex (as shown in Figure 4), information travels rapidly between the brain and body. If an inefficient or compensatory movement pattern becomes automated, it can persist long-term, even when it’s no longer optimal. This is why movement retraining—interrupting old patterns and introducing new ones—requires intentional intervention.
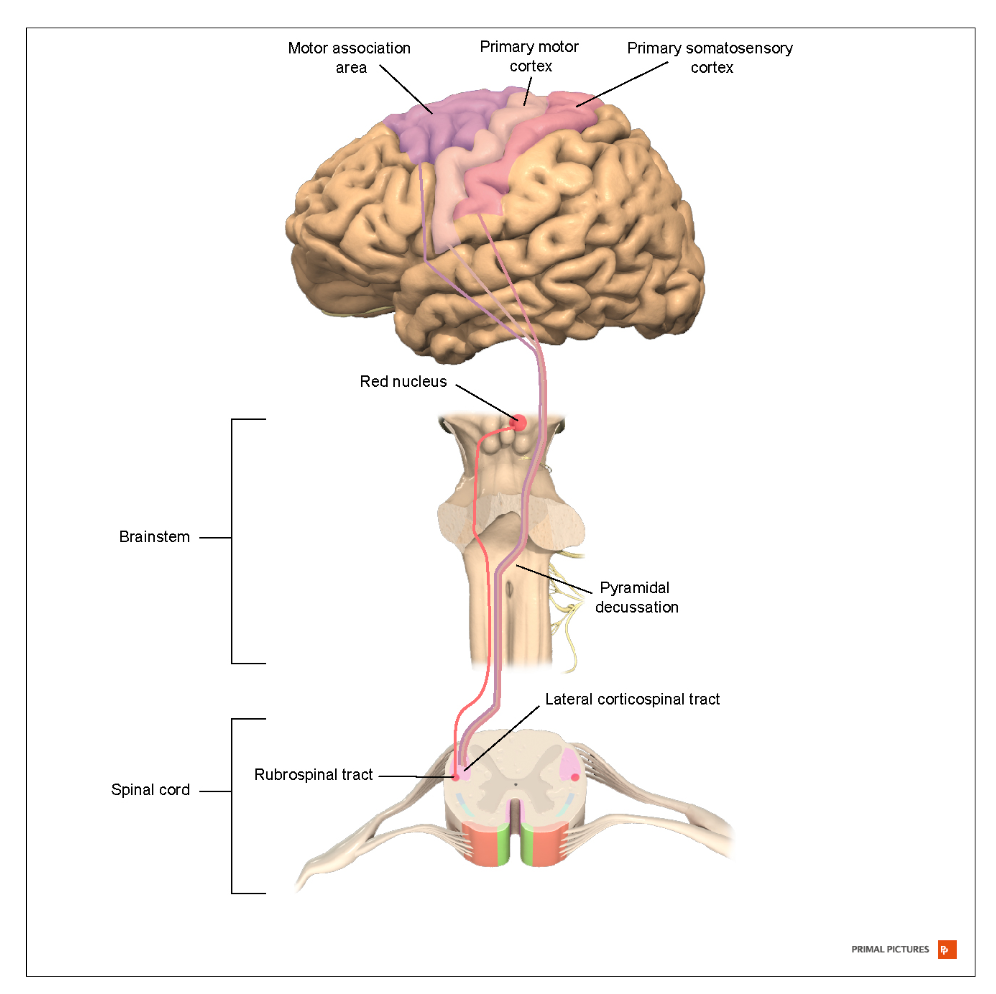
Figure 4. Brain pathway for automatic movement. (Click here to enlarge the image.)
The Dark Side of Redundancy
The downside—or dark side—of redundancy is that while our brains and bodies adapt to temporary challenges, sometimes those adaptations become permanent.
As I mentioned earlier when a motor pattern is disrupted—whether due to pain, surgery, trauma, fatigue, or a simple habit—the body finds an alternative way to accomplish the task. This ability allows us to continue functioning even when conditions aren’t ideal, which is a good thing in the short term.
However, if we repeat a compensatory movement pattern long enough, the brain may view it as the new normal. It rewires the switchboard, replacing the optimized motor pattern with the protective or substitutionary one. Over time, what was once a temporary workaround becomes automated, and the original efficient movement pattern is lost.
Movement is still possible when this happens, but it no longer engages the muscle groups designed to perform the task most effectively. As a result, those compensatory muscles can become overworked, leading to discomfort, increased fatigue, or even pain. Over time, this mismatch can contribute to issues like low back pain, joint strain, or a higher risk of injury.
This is why retraining motor control is so important. It’s not just about strengthening muscles—it’s about ensuring the right muscles are firing in the right sequence for optimal movement. If we don’t intervene, the body reinforces the inefficient pattern, making it even harder to correct later.
Core Reset Options
This matters because if we can reset the system—flipping all of those switches off and then strategically turning them back on—we have a much better chance of successfully guiding the body back to its optimal motor pattern. This is where manual therapy becomes a valuable tool.
Many of us have worked with patients who struggle to execute the movement correctly despite understanding our verbal cues for an exercise. Some may even explicitly say, I know what you're asking me to do, but I have no idea how to do it. When this happens, using a core reset technique or manual therapy can be incredibly helpful. It interrupts the automatic movement pattern, forcing the brain to engage in the motion again actively.
Beyond manual therapy, sometimes breaking movements into smaller components or performing them in an atypical position can also help reset faulty patterns. We’ll discuss this more when we get into specific motor control retraining strategies, but it's important to recognize that effective interventions may require thinking beyond traditional exercise/functional activity prescription.
So what options do we have for a core reset? Essentially, anything that alters neural input to the area can serve this purpose. The timing of these interventions within a session is important, and, as always, the best approach will depend on the patient’s response. You may need to experiment to determine what works best for each individual.
Some effective options include:
- High-velocity, low-amplitude thrust (manipulation): This can provide a strong reset effect by altering proprioceptive input.
- Soft tissue mobilization: This can help reduce protective tension and improve neuromuscular recruitment.
- Muscle energy techniques: These can be useful for resetting muscle activation patterns.
- Joint mobilization (grades I-IV): While not as effective for the immediate reset effect, it plays an important role in improving range of motion, particularly around the rib cage and thoracic spine.
Since the diaphragm is a key player in core control, adequate rib cage and thoracic mobility are essential. If restricted movement in these areas is limiting diaphragm function, joint mobilization can be a critical part of the treatment plan. By improving mobility, we create a more supportive environment for optimal core activation and motor control.
Indicators for Reset
Several indicators suggest that a patient may benefit from a reset using manual therapy. If any of these are present, it may be worth considering whether neuromotor input could help them engage more effectively with their movement patterns.
One of the most common signs is when a patient struggles to perform an exercise despite clear and repeated cueing. If they consistently hold their breath—even after multiple corrections—or if they simply can’t execute the movement correctly, it may indicate that their body isn’t accessing the correct motor pattern.
Another key indicator is when a patient expresses difficulty sensing or controlling their own movement. They may say things like, I can't tell what my body is doing, or I understand what you’re asking, but I have no idea how to make it happen. When this disconnect is present, a reset can help bring awareness back to the movement.
If the patient substitutes one maladaptive pattern for another, that’s another strong clue. For example, if they initially rely on breath-holding to stabilize and, after being cued to stop, they shift into excessive rigidity or overuse of lumbar lordosis, they are still compensating rather than accessing an optimized strategy.
Finally, discomfort or pain that limits their ability to perform an activity can also signal the need for a reset. If they struggle to engage the right muscles because of pain or guarding, altering neural input through manual therapy may help them move more efficiently and with less restriction.
In any of these cases, using a reset technique can disrupt inefficient patterns, improve neuromotor control, and allow the patient to engage with movement in a way that supports better long-term function.
Manipulations, METs
When we use muscle energy techniques or manipulations, we aim to facilitate a quick stretch or a brief period of tissue overload. This helps interrupt chronic motor patterns and feedback loops that may reinforce inefficient movement strategies. Essentially, we are resetting the system to allow for improved neuromotor control.
This raises the question—does the specific technique matter? In school, I was taught that precision was key and that we had to be highly specific in our approach, particularly with spinal manipulations. We learned detailed methods to lock out segments and isolate movement as much as possible. However, research has shown that full isolation of a spinal segment is impossible. While we can target specific regions, we can’t completely isolate one area from the others. Fortunately, we now understand that this doesn’t matter as much as we once thought.
The technique does matter because it must be performed correctly, with good control and targeting the appropriate area. However, there is no single technique that is perfect for every patient. There are many ways to achieve the same goal, and different approaches can be equally effective. What’s important is selecting an approach that aligns with the patient’s needs and your own clinical skills.
Since the goal is to clean the slate and rebuild from the ground up, focusing on areas that show signs of pain, mobility deficits, or guarding during the evaluation is important. The lumbar spine, hips, and pelvis are good targets for lower core resets and can be particularly beneficial for patients with lower back or pelvic stability issues. The thoracic spine is often overlooked but plays a major role in postural control, breathing mechanics, rib cage mobility, and even bladder function due to its proximity to the sympathetic chain ganglia. Mobilization or manipulation techniques in this region can help improve rib cage excursion, upper core function, and breathing patterns, all essential for optimal movement control.
Ultimately, there is no one-size-fits-all formula. It may take some experimentation to determine what works best for each patient based on their movement patterns, symptoms, and response to intervention. It’s also important to recognize that your skill set and comfort level with different techniques will influence your approaches. The key is to remain flexible in your approach and tailor the intervention to the patient in front of you.
Manipulation
There are many options for resetting motor patterns, so it’s important to choose what seems to work best for the patient. Sometimes, that means selecting an approach that accomplishes multiple goals at once, and if one technique isn’t effective, it’s always worth trying something different. The good news—and the challenge—is that there are many right ways to approach this.
Here are some images demonstrating manipulations, but I won’t be teaching specific techniques during this webinar as that isn’t the primary focus (Figure 5). Likewise, I won’t go into great detail on muscle energy techniques, but I do want to highlight one in particular that I’ve found extremely helpful, especially for addressing pelvic floor dysfunction.
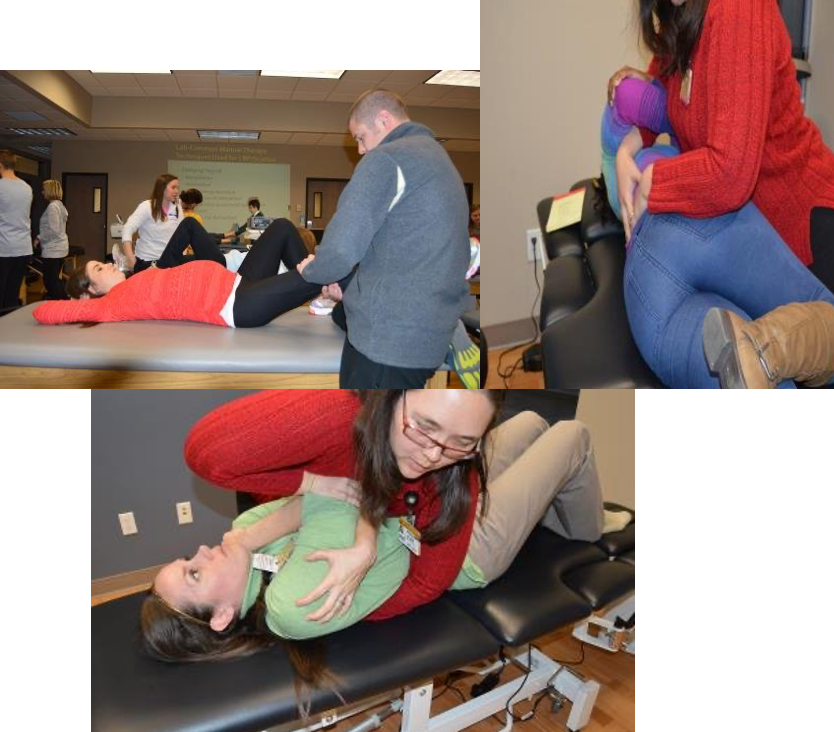
Figure 5. Examples of manipulation techniques.
Some of you may already be familiar with this technique. I was taught to call it the “pelvic shotgun,” but I’ve heard it referred to by other names as well. The name isn’t important—the technique itself is what matters. To perform it, the patient is stabilized on both sides and then they abduct against resistance. I typically cue them, saying, “Push out against my arms.” The pressure should be moderate—enough to engage the muscles without excessive strain. They hold this contraction for about eight to ten seconds, aligning with the recommended muscle energy technique duration. After completing this movement three times, the next step is to place a fist between their knees and have them squeeze inward.
If this position isn’t effective, modifications may help. Instead of a narrow squeeze, they can engage from a wider base by pressing against a combination of the clinician’s hand and elbow. Another variation is to have them squeeze a fist between their knees while simultaneously performing a bridge.
This technique is particularly effective for resetting suboptimal motor control strategies in the pelvic floor. It can be an excellent option for patients unable to engage in internal work, whether due to a lack of clinician training or patient comfort level. If the technique proves beneficial, I often teach patients how to replicate it at home. They can use a belt around their knees, along with a small object like a yoga block or tennis ball to squeeze, allowing them to continue reinforcing the reset on their own or with the assistance of a partner.
Muscle Energy Technique
Any muscle energy techniques already part of your personal skill set are fair game and can be valuable in this process. The key is to use what works best for the individual patient and to be adaptable in your approach.
Soft tissue mobilization is another powerful tool. We talked last time about how to assess for adhesions and scar tissue, particularly in the abdomen, and how these restrictions can create additional movement challenges. Adhesions can develop in various areas, including the pelvic floor, abdomen, and posterior chain, impacting core function.
It’s also important to think beyond the immediate area of dysfunction. I know I’ve mentioned this before, but it bears repeating—evaluation and treatment should extend both up and down the kinetic chain. Research has shown strong correlations between cervicogenic headaches, TMJ dysfunction, and pelvic floor or core dysfunction. Because of this, I often incorporate cervical soft tissue mobilization into treatment, as it can influence diaphragm function and overall nervous system regulation.
Targeted diaphragm mobilization is another beneficial technique. While I won’t attempt to teach specific methods in this format—since many require hands-on practice, refined palpation skills, and real-time feedback—I highly recommend seeking specialized coursework for those who want to expand their skills. The ability to directly influence diaphragm mobility can significantly affect core function and overall movement efficiency.
There are many ways to approach these interventions, and the more tools you have at your disposal, the better equipped you’ll be to tailor your approach to each patient’s specific needs. Some examples are in Figure 6.
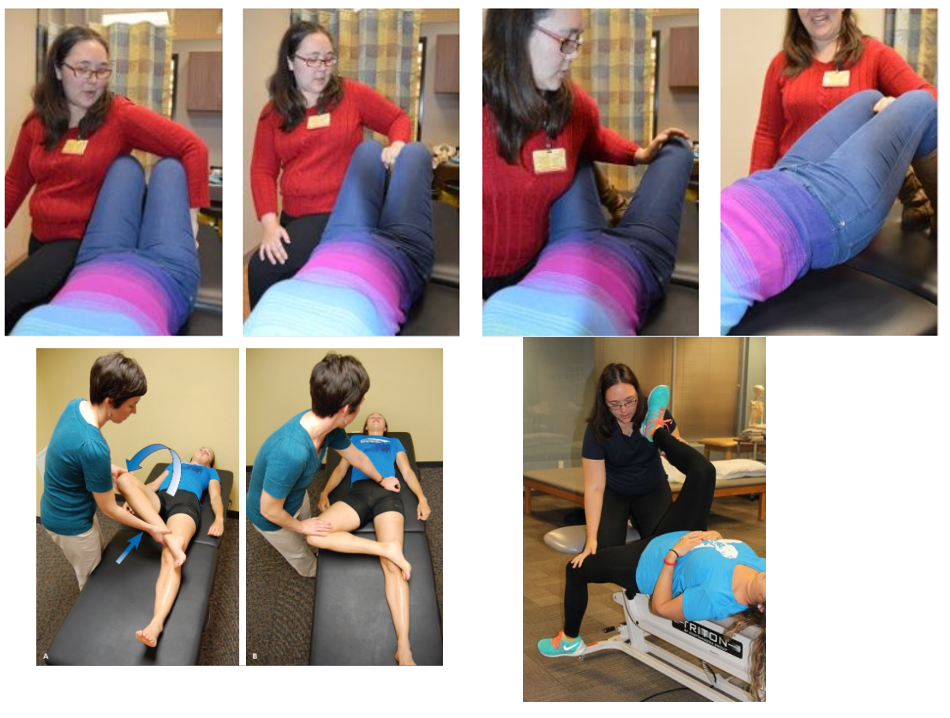
Figure 6. Examples of muscle energy techniques.
Soft Tissue Manipulation
I like to combine soft tissue mobilization with muscle energy techniques, alternating between the two throughout a session. I’ll start with some soft tissue work, then move into a muscle energy technique, follow that with more soft tissue work, and then apply another muscle energy technique. This combination tends to be very effective in facilitating neuromotor reset.
Lower rib cage mobilization can also be integrated into this approach, particularly when working on a diaphragmatic excursion. I also do significant soft tissue work in the abdomen, especially for individuals with tightness, adhesions, or guarding patterns. These restrictions can interfere with optimal movement and motor control, so addressing them can be key to resetting the system.
One question is whether thoracic mobilizations can be included in this process. The answer is absolutely yes. Thoracic mobilizations are highly beneficial, and I frequently use them, particularly for patients with breathing difficulties or those who demonstrate a motor control pattern of breath holding. Improving mobility in the thoracic spine can significantly impact overall core function and movement efficiency.
While I don’t have videos in this lecture, excellent resources are available online. If you search for “muscle energy technique” along with the specific area you’re interested in—such as the pelvis or lower back—you'll find many helpful demonstrations on YouTube. I recommend exploring those as a supplement to this discussion.
There are many ways to restore optimal motor control. There isn’t a magic fix, and it’s normal to cycle through different techniques to see what resonates best with each patient. Everyone’s body responds differently, and that’s not a limitation—it’s an opportunity. The variety of available tools allows us to tailor treatment to each individual and find an approach that works for them.
Ultimately, I may not be introducing anything dramatically new to your practice, but I hope this provides a different way to think about these techniques and how to maximize their impact. By integrating mobility work with proprioceptive input and neuromotor retraining, we can get more out of the treatments we already provide.
Motor Control Retraining
Now, let's dive into motor control retraining.
Begin With the End in Mind
We have to begin with the end in mind. What are we trying to achieve? The goal is motor control, not just strength. Strength alone doesn’t help if the muscles aren’t working together to generate appropriate intra-abdominal pressure. The key is ensuring that the neural pathways supporting coordinated movement function effectively.
I know I’ve mentioned this before, but it’s worth repeating. I’m not saying that isolated muscle activation isn’t useful. People often ask me, as someone trained in pelvic health therapy, what I think about Kegels or isolated transverse abdominis contractions. Are they good? Are they bad? Do they have value? The answer is that it depends, but generally, they serve a purpose—primarily for proprioceptive feedback.
One way to consider it is to consider someone recovering from ACL surgery. Early in rehab, we often use quad sets to help reestablish the connection between the quadriceps and the brain. This reminds the brain, Hey, you turned this muscle off as a protective response to swelling and injury, but we need it again—let’s get it back online. However, no one would ever consider a quad set the final step in rehabilitation. It’s just an early phase to restore functional movement in a much larger process.
Kegels and isolated transverse abdominis contractions serve the same purpose. They help patients recognize and engage these muscles but are not a standalone solution. They cannot be the endpoint; they are simply one step to retraining motor control.
Some clinicians might argue that they’ve used isolated strengthening strategies for years and seen their patients improve. And it’s true—some people respond well to that approach. The brain can often take an isolated strengthening cue and integrate it into movement patterns. However, strengthening in isolation is only part of the solution for many patients. If we stop there, we may unintentionally reinforce a different suboptimal motor control strategy rather than truly optimizing movement.
This can lead to the frustrating cycle of “frequent flyers” in therapy—patients who improve temporarily but whose symptoms keep returning. In some cases, they may even conclude that therapy wasn’t effective and turn to more invasive interventions. The problem isn’t that isolated strengthening is wrong—it’s simply incomplete. We inherently understand this in other rehab areas, but we may not always think about it in relation to core and pelvic floor function. The challenge is applying what we already know to this system to support long-term, functional recovery.
Motor Control Retraining: Lower Core
Let’s talk about the lower core. When I refer to the lower core, I’m talking about the part of our core that provides foundational support for the torso and trunk, particularly concerning larger movements involving the lower and, to some extent, the upper extremities. People often picture this area when they think of the core—the space between the rib cage and the pelvis.
So, where do we start? My recommendation is to begin with breath. Breath control is fundamental to core activation and stability. It directly influences intra-abdominal pressure, which is key in supporting movement. Establishing optimal breathing mechanics before focusing on specific exercises or strengthening techniques helps set the stage for effective motor control and overall function.
Breath Retraining
Breath retraining is an essential starting point, and there are many advantages to incorporating it early in the process. One of the biggest benefits is that it helps reactivate cortical pathways.
It’s common for patients with core dysfunction to stop using their diaphragm effectively or at least to use it suboptimally. The good news is that, in most cases, they have used their diaphragm correctly at some point. There are very few instances where that isn’t true. This means the neural pathway for proper diaphragmatic breathing still exists—it hasn’t disappeared, but it may be buried, like an old habit that’s been forgotten. By retraining breath, we can bring that pathway back into the forefront, making it easier to restore proper core function.
Breath training provides a strong foundation for both movement and stability. One of its most valuable aspects is how it translates into more complex and dynamic movements. No one consciously thinks about their core or pelvic floor activation when performing high-level tasks or rapid movements. Have you ever tried running while focusing on what your pelvic floor is doing? If you can do that, your brain is working at a level far beyond mine.
However, we can focus on breathing patterns during those activities. We can use breath as a natural cue during functional and athletic movements if we train a movement pattern where the diaphragm initiates coordinated core activation. It’s an incredibly effective way to integrate core engagement into real-world activities, almost like a magician’s trick—except backed by science.
Another major advantage of breath retraining is its role in biofeedback. Because breathing is visible, patients can see themselves in a mirror and recognize their breath mechanics, even when working with muscles like the pelvic floor or transverse abdominis, which are otherwise difficult to perceive. This makes it a powerful tool for motor relearning.
Finally, appropriate mobility in the rib cage and diaphragm is critical to effective breath control. If mobility restrictions exist in these areas, they must be addressed to optimize core function fully. Without that foundational movement, retraining the system and restoring proper motor control becomes much harder.
Breathing
The importance of breathing can’t be overstated, and I want to quickly revisit a key concept we discussed last time. The pelvic floor also lowers when the diaphragm pulls down during an inhale. When the diaphragm rebounds on an exhale, the pelvic floor lifts. This movement happens reflexively, provided there is no neurological injury preventing it. If we can get a patient to truly engage their diaphragm while breathing, we are also engaging their pelvic floor, even if they aren’t consciously aware of it.
Although this isn’t a pelvic floor-specific class, the pelvic floor plays such a significant role in core function that it’s worth emphasizing. As a pelvic floor therapist, I’ve had patients with no proprioceptive awareness of their pelvic floor, no matter what strategies I used. However, they still saw meaningful improvements when we focused on diaphragmatic breathing and trusted that the pelvic floor would respond naturally. This underscores the power of breath retraining in core rehabilitation.
There are many techniques to help patients learn to breathe more effectively, though they are often skeptical at first. When I tell patients we will work on breathing, they sometimes laugh and say, But I’m alive, I must be breathing correctly. However, if they rely primarily on chest and accessory muscles, they aren’t getting the full benefits of diaphragmatic excursion.
One of my favorite techniques is placing patients' hands on the lower part of their rib cage. If you want to try this now, place your hands there and focus on expanding your ribs outward as you inhale. I cue patients by saying, Blow my hands up like a balloon. The goal is not just to push the belly forward, as isolated belly breathing does not provide the well-rounded diaphragmatic movement we aim for. Instead, I encourage what some call "umbrella breathing"—a 360-degree expansion of the rib cage, including forward, lateral, and even posterior movement.
Using hands for feedback can be helpful, but patients can also use external tools to enhance proprioception. One strategy is to wrap a soft belt or bathrobe tie around the lower rib cage, crossing it in the front. This isn’t for resistance but rather to give them a tangible way to feel the expansion of their breath. I sometimes use a heavier TheraBand, typically blue or black, for the same purpose. The goal is not to provide resistance but to enhance awareness, helping the patient visualize and feel their breath filling the entire rib cage like a balloon.
Supine positioning is often the easiest place to start, as it allows the patient to focus solely on breathing without managing posture or other movement demands. Once they develop awareness and control in this position, we can progress to more functional postures and integrate breath into movement. Refining this foundational skill creates a strong base for improving motor control and optimizing core function.
Breathing Progression
Some progressions you can make for breathing are seen in Figure 7.
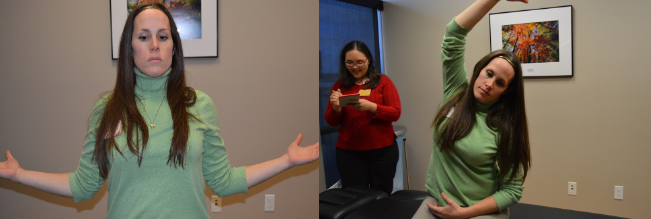
Figure 7. Wing arm and side bends.
A great way to facilitate breath retraining is with the wing arm exercise. This begins with the hands positioned in front of the body. As the patient inhales, they bring their arms outward into shoulder external rotation, naturally encouraging chest expansion and allowing the shoulders to drop down and back. On the exhale, the arms come back together. This movement reinforces diaphragmatic breathing and promotes improved postural awareness and mobility.
To enhance this exercise, you can integrate spinal flexion and extension, allowing for more dynamic movement with the breath. Another variation involves adding a side bend, particularly useful for patients who struggle with lateral expansion on one side. In this case, they inhale while raising one arm over their head, expanding the side of the rib cage, and then exhaling as they bring the arm back down. This targeted approach can help improve asymmetrical breathing patterns and encourage balanced movement.
Introducing balloon breathing can be extremely effective for a more advanced progression of diaphragm retraining—especially when working with high-level athletes or individuals needing to perform high-impact activities. Once a patient has mastered foundational breath control, adding the challenge of exhaling into a balloon while performing another task provides resistance for the diaphragm, creating an additional layer of training. This increases the demand on the respiratory muscles and enhances breath control under load, making it a great tool for advanced core training.
Pelvic Floor Activation
Pelvic floor activation can be approached in various ways, which is great because different techniques work for different people. Exploring multiple positions and strategies is important to find the most effective for each individual.
One of the best starting positions for pelvic floor activation is hook-lying. In this position, the person is fully supported, so they don’t have to focus on maintaining posture or engaging other core muscles. This allows them to concentrate solely on activating the pelvic floor. Hook-lying also allows palpation, similar to the evaluation process discussed last week. With a hand placed at the right location, it becomes easier to give feedback, whether that means confirming activation, guiding adjustments, or helping the patient fine-tune their effort.
However, hook-lying isn’t the best option for everyone. Side-lying, quadruped, or seated positions can also be effective. Seated activation is particularly valuable, especially when using a physioball because it provides built-in biofeedback. If you’re sitting right now, take a moment to notice the area between your ischial tuberosities. You should be able to feel that connection with the seat or the ball beneath you. From this position, try inhaling deeply and then exhaling while gently drawing the center of your pelvic floor upward. The goal is to subtly reduce the pressure between you and the surface, creating a lighter sensation. If the movement isn’t quite right, try again, focusing on subtle engagement without excessive effort.
One common mistake is substituting pelvic floor activation with other movements, such as squeezing the glutes or tilting the pelvis. Sitting on a firm surface or a physioball provides feedback that helps prevent these substitutions. If the glutes engage too much, the person will feel it immediately, making adjusting easier. Seated work is especially helpful for pediatric patients, assuming they can remain still long enough to engage in the exercise.
On an exhale, the pelvic floor contracts concentrically, shortening to provide support. This is particularly useful when performing a challenging activity that requires core stability, such as lifting a heavy object. The harder the exhale, the stronger the pelvic floor activation. This principle explains why athletes in sports like tennis often let out a sharp breath, such as a “ha!” sound when making a powerful movement. That forceful exhalation naturally engages the pelvic floor and deep core, creating the stability needed for high-intensity actions.
The pelvic floor elongates eccentrically on an inhale, lowering as the diaphragm descends. This movement should be controlled, though control may be limited at the beginning of rehabilitation. Eccentric elongation is best paired with the less challenging portion of a movement, particularly when resistance is involved.
To help patients learn proper pelvic floor activation, it’s important to discourage compensatory patterns. Some of the most common substitutions include posterior pelvic tilting, excessive glute activation, and overuse of the abdominal muscles. While the transverse abdominis will naturally engage to some extent, it shouldn’t dominate the movement.
One helpful strategy for improving proprioceptive awareness involves using the hip adductors as facilitatory muscles. Since the adductors and pelvic floor share a functional relationship, their activation can enhance pelvic floor engagement. A simple way to implement this is by having the patient sit with a small ball or yoga block between their knees. As they inhale, their pelvic floor naturally relaxes. Then, on the exhale, they gently squeeze the object, maintaining the contraction throughout the entire exhalation before releasing it gradually with the next inhale. This technique can be a great way to reinforce the mind-body connection and improve motor control of the pelvic floor.
Verbal Cues for Pelvic Floor
Many different cues can be used to facilitate pelvic floor activation. If you already have a cue that works well for you and your patients, keep using it—there’s no single "magic" cue. Research has shown that different cues work better for different people, so if one isn’t effective, it’s worth trying another until something clicks. I don’t have a more scientific method for selecting cues other than cycling through them until I find the one that gives the patient that aha moment.
While I personally have favorites that I start with, I’ll begin with my least favorite, which is also one of the most commonly used: Act as if you're trying to stop the flow of urine. While this can be an effective way to engage the pelvic floor, it’s crucial that patients understand they should not regularly practice stopping their urine flow during urination. Doing so can train the bladder to retain urine, leading to incomplete emptying and creating an entirely different problem. I only recommend this as a one-time check, and even then, no more than once every three days, to ensure they can correctly engage the pelvic floor.
Another cue is to Act as if you're trying to stop yourself from passing gas. This can be particularly helpful for patients with better proprioceptive awareness of the posterior portion of their pelvic floor than the anterior portion. It’s also a great way to introduce the concept in a lighthearted manner, especially for those who may feel uncomfortable discussing pelvic floor function. I often frame it as if you're in a crowded elevator and need to pass gas, but you’re trying to hold it until you get off. Almost everyone can relate to this, which helps break the ice.
Some patients respond well to the cue. Draw your muscles up and in. If working with someone who has testicles, a particularly effective cue is to lift your testicles as if you’re about to sit on something very cold or very hard. This is another one that many patients instinctively understand.
Other common cues include Pretend like you're lifting a kidney bean with your pelvic floor or Imagine you’re sucking water up a straw. While I personally haven’t found these to resonate as much with my patients, I know many clinicians who use them successfully, so they are worth keeping in mind.
My personal favorite cue is to Pull your sit bones toward each other. Where I practice, the term "sit bones" is the commonly used vernacular for the ischial tuberosities, though this may vary regionally. While the bones themselves don’t actually move, the intention of pulling them together creates an excellent pelvic floor contraction. If you want to try it now, you’ll likely feel a strong and controlled engagement of the pelvic floor. This cue has consistently worked well for my patients, making it my go-to option.
Ultimately, the best cue is the one that resonates with the individual. If one approach isn’t working, try another until the patient experiences a clear connection with their pelvic floor activation.
Advancing PF Exercises
Combining pelvic floor activation with breath control can be a powerful way to progress training. Once a patient learns to activate the pelvic floor, the next step is ensuring they can engage and release it through a full range of motion. I cue this by having them activate, let go, and repeat the process.
To help patients understand this movement better, I often use the elevator analogy. Just as an elevator moves up and down, the pelvic floor needs to lift and lower with control. The eccentric phase—where the pelvic floor elongates—is just as important as the concentric phase, and we want to ensure that the lowering is controlled rather than passive.
I describe this by having the patient imagine they are in a five-story hotel. They start in the lobby, and when they activate their pelvic floor, they bring the elevator up to the penthouse on the fifth floor. Then, when they elongate, they let the elevator return to the lobby. From there, they gently lower it one more floor into the basement, but not as far down as they went up. This visualization helps patients develop better awareness of both contraction and release.
Adjusting body position can be helpful for patients who struggle with activation or relaxation. If someone has difficulty releasing tension in their pelvic floor, placing them seated or on a physioball allows gravity to assist in the relaxation phase. Sitting on a ball also provides sensory feedback, helping them feel changes in pressure as they engage and release. If they have trouble with activation, starting in a child's pose position or elevating the hips on a wedge or pillow may provide the necessary support to facilitate contraction.
For the relaxation phase, I remind patients that they are not straining or holding their breath. The goal is a gentle release, not a Valsalva maneuver. Sometimes, I cue this by asking them to imagine the sensation of letting go as if they were passing gas or initiating a bowel movement.
If patients need more advanced control, particularly for conditions like urinary leakage or pain during prolonged activities such as running, they may benefit from specifically retraining the eccentric phase of pelvic floor movement. To achieve this, I modify the elevator cue by introducing pauses. Instead of simply lowering from the fifth floor to the lobby, I ask them to stop at the third floor before continuing downward. Then, in another repetition, they pause at the second floor. The exact location of the pause isn’t critical—what matters is their ability to gradually control the descent of the pelvic floor rather than allowing it to drop all at once.
A great question about the functional advantage of elongating or bulging the pelvic floor beyond the resting position often arises. The primary purpose is to allow patients to engage their pelvic floor from various starting points. If a patient tends to have excessive pelvic floor tension, what they perceive as their "lobby" or resting state may be a slight contraction rather than a true rest. Teaching them to move beyond that perceived baseline can help reset their awareness and improve overall function.
Much of what we’re doing at this stage is still building proprioceptive awareness. Even though this is a progression, it remains part of the early training phase, setting the foundation for more advanced movement and motor control.
Transverse Abdominis
Isolating the transverse abdominis is an important core training component, but I won’t spend too much time on it since many people already have some experience cueing this muscle. I tend to focus more on the pelvic floor because fewer clinicians have extensive practice with those cues.
For transverse abdominis activation, I like using the analogy of the ASIS as “headlights” and cueing the patient to cross the headlights. This visual works perfectly for many people and helps them engage their muscles correctly. Another cue I use is asking them to pull their ASIS toward each other. Even though the bones don’t move, this imagery seems to help patients connect with the action we’re looking for.
Another effective cue is to imagine zipping up from the pubic bone toward the belly button. Sometimes, I have patients palpate the area so they can feel how their transverse abdominis activates along with the pelvic floor, and then I instruct them to enhance that contraction slightly. Tactile feedback, whether from my hands or their own, can be very helpful in reinforcing awareness.
I always ensure that the transverse abdominis engages alongside the pelvic floor. As with other muscle activation techniques, we can load or unload the movement depending on the patient's needs. My primary goal at this stage is building proprioceptive awareness.
Once a patient has developed awareness of the transverse abdominis, pelvic floor, and diaphragm in isolation, I transition as quickly as possible into functional movement. I try to spend the least time isolating these muscles, only staying in this phase as long as necessary to establish control. While breaking it down into individual components can be helpful initially, the real goal is integrating these activations into meaningful movement.
Bracing Strategies
So far, we've mostly been talking about isolated isometrics. I know that I have mentioned this before, so I'm not going to beat it to death, but this is just a reminder that those isolated isometrics don't necessarily replicate function. Now, some people's brains do an amazing job of going, "Oh, right, right. This muscle, I know how to use this." And then just running with it.
However, we need to train most other patients in movement. So, how do we ensure that we're doing that?
Retraining Functional Movement
So think about what we need for functional movement. We need anticipatory control and the ability to engage core stability for balance. One effective way to train this is by destabilizing the person or the surface they are on. This can be done in various positions, such as side-lying or quadruped, depending on what best supports the movement retraining process. The key is to focus on movement and movement strategies rather than just isolated muscle activation.
When retraining a movement that someone is familiar with—meaning they have a deeply ingrained motor pattern—you may need to break that movement apart before rebuilding it. For example, I work with a lot of CrossFit athletes, and one of the hardest movements to retrain for them is the squat. That may seem surprising because CrossFit athletes always squat, but that’s why it’s difficult to change. Their brain has an automatic motor pattern for squatting, and when they hear "squat," they default to executing it the way they always have.
In these cases, I often can’t retrain their squat by simply cueing them during a squat. Instead, I take them into a different position—maybe side-lying or another unloaded posture—to isolate and retrain the individual elements of a squat first. Once they demonstrate better movement in those isolated pieces, I reintegrate them into a full squat, typically without load. After mastering the movement in an unloaded state, we gradually introduce light resistance and progress from there.
When moving into functional movement retraining, we must look at the whole body and the person’s overall movement strategy. This is where everything from the evaluation process comes back into play. A common question I get is, How do I know what the pelvic floor is doing when someone is squatting, jumping, or running? Obviously, we can’t palpate the pelvic floor during those activities, nor can we directly see what it’s doing.
But what we can observe are the person’s known substitution patterns. If a patient’s default compensation is breath-holding, and they begin breath-holding during a movement, that’s a clear sign that they are not optimizing their core engagement. That doesn’t necessarily tell us whether the issue is coming from the pelvic floor, the transverse abdominis, or another core muscle, but it does signal that something isn’t working efficiently.
When this happens, there are a few possibilities. The movement may be too difficult at this stage, requiring a step back in complexity. The person may have such a strongly ingrained motor pattern that they need more gradual retraining. Or they may just need a small cue to remind them of what they’ve already learned. In those cases, I might say something like, Remember when we were working on exhaling and activating your pelvic floor while lying on the table? I need you to try to do that now while you perform this movement.
We can help patients successfully integrate optimized core functions into their natural movement patterns by staying aware of these patterns and addressing compensations as they arise.
Putting It All Together
Now, let’s talk about how to put everything together.
Start with breath retraining in different positions—supine, sitting, and standing are all great options. Once the breath pattern is established, layer in a pelvic floor contraction, knowing that it naturally moves with the diaphragm. From there, add transverse abdominis activation and begin incorporating dynamic movements.
I have a few examples listed on the slide, but what I find exciting about this process—and I realize I might be alone in this as an anatomy and core geek—is that once you understand these principles, any exercise can become a core optimization exercise. There isn’t a single "magic" protocol that applies to everyone, but rather a set of principles that can be applied in countless ways.
No matter what movement you’re working on, you can turn it into an opportunity for motor control training based on how you cue it. Whether it’s a basic movement like standing up from a chair or a complex athletic task, how you guide breath, core engagement, and sequencing can make all the difference in helping the person develop optimal core function.
Motor Control Retraining: Upper Core
I'm going to go ahead and move into the upper core. We won’t spend quite as much time here, but I do want to cover it briefly so that you have a solid foundation for thinking through this aspect as well.
Foundation
Your foundation for the upper core is breathing because the diaphragm’s movement directly influences this region as well.
The primary muscle groups you’ll focus on here are the scapular stabilizers and the deep neck flexors. We already know how to perform scapular retractions and isometrics and how to integrate movement into these exercises. The key is thinking about when to inhale and when to exhale to optimize activation.
In this case, the scapular stabilizers move in the same direction as the diaphragm. This is similar to the pelvic floor, but the difference lies in the relationship between concentric activation and elongation. When the diaphragm drops during inhalation, the scapular stabilizers activate along with it. So, if you inhale as you engage the movement and exhale as you release, you’ll reinforce that connection and optimize activation of the upper core.
Deep Neck Flexors
We can train the deep neck flexors using chin tucks while looking for substitution patterns. A common compensation is shoulder shrugging, which I see frequently. Another is excessive activation of the upper trapezius or other larger accessory muscles that shouldn’t take over the movement.
To optimize training, we can modify the challenge by adding or removing the effects of gravity and progressively incorporating more functional movement. As with the lower core, we start with smaller, isolated, and sometimes isometric components, then gradually build from there.
You already have a set of effective exercises for retraining deep neck flexors and scapular stabilizers. This is just a reminder to integrate those strategies while keeping the principles of core optimization in mind.
Dynamic Training
Dynamic training for the upper core can be highly effective, and throwing is a great way to incorporate high-impact movement. Punching is another excellent option, so I often use kickboxing-style movements with my patients. These activities create dynamic, high-force engagement of the upper core, reinforcing strength, stability, and coordination.
There are many ways to train the upper core dynamically. Scapular punches, alphabet exercises with weights, or perturbation training where the patient resists external forces are all great options. Weight-bearing exercises, such as transitioning from a downward dog into a push-up with a plus or using an upside-down BOSU for instability, can further challenge upper-core stability and control.
The key is that there’s no single correct approach—many exercises can be adapted for core retraining. The answer is likely yes if you’re wondering whether a particular movement could be useful. As long as it’s cued correctly, nearly any exercise can be turned into a core optimization exercise.
Pull It All Together
Let's discuss putting it all together and truly moving into functional optimization or retraining.
Integrate Into Any Movement
Again, you can integrate core training into almost any movement. Here are some options for engaging the entire core—upper and lower—simultaneously.
You can incorporate scapular work or arm movements into static positions like chair poses, wall squats, or traditional squats. For example, while holding a squat, patients can retract their scapulae and perform biceps curls or other arm exercises. Planks are another excellent option if the patient is able to perform them. Incorporating a physio ball with planks, pikes, or other variations can add an extra challenge for higher-level patients.
For patients who aren’t able to do a full plank, there are many ways to modify the exercise while still maintaining core engagement. Wall planks are a great alternative, providing similar benefits at a more accessible level. If working in a clinic with a plinth, using a high-low plinth allows for gradual progressions. At home, a staircase can be an excellent tool for titrating plank difficulty—patients can start on a higher step and gradually work their way lower as they build strength.
Side planks can also be adapted. A patient can transition from a plank to a side plank against a wall, countertop, plinth, or even a sturdy staircase. If performing these at home, they should ensure they are using a stable, non-sliding surface. In some cases, patients have used a couch backed against a wall for added support.
If a patient is unable to hold a chair pose, they might sit on a slightly unstable surface, such as a physioball. This allows them to work on postural control and core activation without fully bearing their weight.
This is where creativity comes into play, making the process both effective and engaging. Finding the right way for each patient to move their body to meet their goals—while accounting for their mobility, fitness, and strength levels—is where the true skill of our profession shines. It’s a dynamic and rewarding process and one of the most enjoyable aspects of this work.
Anticipatory Training
Don’t forget about anticipatory training. We talk about it often, but just as a reminder, the core is designed to activate before movement occurs—not as a reaction to it. For example, if I reach for a door handle, my core should fire first.
One of the best ways to train this is by incorporating activities that introduce perturbations or require stabilization on an unstable surface. A physioball can be a great option, depending on the patient’s ability level. For higher-level patients, you might introduce a BOSU ball for squatting or dynamic movement challenges. Sliders are another useful tool—these small, fabric-like discs glide across the floor, allowing for movements like lunges where the patient slides back rather than stepping.
Upper core training can also be progressed using a BOSU ball, or by incorporating a rebounder for controlled anticipatory movements. Single-leg stance exercises are another great way to challenge anticipatory control. You can add perturbations or combine balance training with upper extremity movements, such as biceps curls, flies, or reaching tasks. Using foam pads or other unstable surfaces in the clinic—or even pillows for home exercises—can further refine this skill.
Another great question is whether the focus should be on maintaining correct breathing patterns during these progressions while also monitoring for substitutions. The answer is absolutely yes. Once patients engage in more advanced movements like squats, push-ups, or single-leg stances, they won’t consciously think about their pelvic floor or transverse abdominis. Instead, if they’ve established an effective motor control pattern through breath training, these muscles will naturally activate in coordination with their movement.
One of my favorite cues is to blow before you go—exhale during the hardest part of the movement. For example, when performing a squat, inhale on the way down and exhale as you come up. This simple adjustment can immediately resolve common issues like pain or urinary leakage. I’ve worked with older patients who struggled with pain or leakage when standing up from a chair, and in many cases, the problem was due to holding their breath and performing a Valsalva maneuver. Sometimes, simply instructing them to start exhaling as they stand up eliminates the issue entirely—it’s one of those moments that feels almost like magic.
Another great question was whether cueing diaphragmatic breathing is the key to integrating core activation into these movements. The answer is yes. Breathing can serve as a cue for proper core engagement and as an indicator of whether someone uses substitution patterns. If a patient starts breath-holding during an exercise, it signals that the movement may be too difficult, that they need better cueing, or that the movement should be broken down into smaller components before being reassembled.
When diaphragmatic breathing is taught correctly, it becomes an automatic guide for core engagement during higher-level activities.
Special Population-Diastasis Rectus
Now, as promised, let’s discuss how to approach rehabilitation for diastasis recti.
Management
If you’re working with someone who is freshly postpartum or, like the patient I mentioned earlier who experienced an acute diastasis while chopping wood, the priority during the acute healing phase is to provide external support for high-pressure activities. I have patients use their hands to brace their abdomen by placing them on both sides of the rectus abdominis, pressing inward, and holding during activities that create intra-abdominal pressure, such as coughing, sneezing, or even laughing.
The duration of this bracing depends on the individual’s healing process, but for an acute case, I usually recommend continuing this practice for at least three to four weeks while the tissues begin to settle. During this time, it’s important to avoid movements that stress the linea alba, such as sit-ups, crunches, or even sitting straight up from bed. Instead, I instruct patients to log roll onto their side and then push up sideways to minimize stretching of the connective tissue, allowing it to heal in a more optimal position.
Some people use abdominal binders, and while I don’t have an issue with them, I don’t want patients wearing them 24/7. If they are up and moving more during the acute phase (typically the first two to four weeks), a binder can provide additional support, but I wouldn’t recommend continued use beyond that point.
Gentle transverse abdominis and pelvic floor training can begin right away, using early-level isometrics and basic pelvic floor activations. Patients can continue using manual bracing if needed or, alternatively, kinesio tape for support.
A simple way for patients to determine whether an activity is safe for their diastasis is to observe whether they experience coning—that telltale midline bulging that looks like a small mountain rising at the abdomen. If they notice coning, it indicates that the activity is either too advanced at this stage and should be avoided, or if it’s an unavoidable action (such as coughing), they should brace to support the area.
A great question that often comes up is whether this acute management approach applies to post-operative patients recovering from abdominal surgeries like hysterectomy or gallbladder removal. The answer is yes. The same principles apply, though the specific bracing location may need to be adjusted to avoid direct pressure on surgical wounds. Providing gentle external support and avoiding crunching-style movements are sound recommendations for any abdominal surgery recovery. If you’re fortunate enough to receive referrals for post-operative abdominal surgery patients, this approach could help prevent many complications we commonly see later.
As healing progresses, we gradually introduce more advanced and functional positions. The primary goal is to ensure that the patient can effectively regulate and control intra-abdominal pressure. Signs that this regulation isn’t happening include breath-holding, coning, or excessive lumbar lordosis, which may indicate that the movement is too demanding at that stage.
Kinesiotape
There is a kinesio tape technique that works really well for diastasis, as seen in Figure 8.
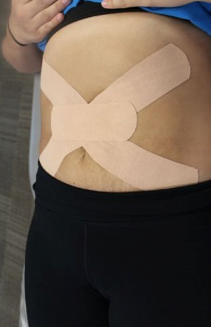
Figure 8. Kinesiotaping technique.
They're probably a little longer than necessary, but that’s fine.
To apply kinesio tape correctly, start by identifying the area with the largest gap, which you’ve already determined through the assessment discussed earlier. Lay down the first two pieces in a crisscross pattern. It doesn’t matter which piece is on the bottom, but each should have a 50% stretch applied across the middle. When placing these, peel the tape from the center outward, stretch it, and back off to 50% before laying it down. The final piece is applied straight across the gap.
This technique can be particularly beneficial for those experiencing discomfort related to diastasis. My postpartum patients love it, and I use it frequently.
I previously mentioned measuring diastasis in three locations because the separation can occur at different points along the linea alba. One of the most common areas is around the navel. It’s important to note that everyone naturally has a small belly button separation since the umbilicus is an opening in the fascia. However, if there’s a noticeable increase in separation or excessive sinking at the navel, it may indicate a significant diastasis. Some patients have a full-length separation from the sternum to the pubic bone, but this is less common. I often see either an upper diastasis closer to the rib cage or a lower diastasis closer to the pubic bone.
A great question came up about whether kinesio tape can be used for patients with diastasis more than a year postpartum. The answer is yes. The timing postpartum isn’t as critical because the goal of kinesio tape isn’t to act as a brace. Kinesio tape doesn’t provide rigid support but rather enhances proprioceptive awareness, cueing the brain to direct tension in a specific way. While the effects may be more pronounced in an acute case, I still use it successfully even years after the initial onset.
For an upper diastasis—a separation near the rib cage—the focus should be on guiding the abdominals downward and inward rather than upward and forward. This might sound counterintuitive, but cueing patients to widen their rib cage during movement is key. This subtle expansion actually helps draw the abdominals downward and inward, reinforcing optimal engagement.
Another question about kinesio tape—yes, all three pieces should be ripped in the middle and applied with a 50% stretch across the center. Thank you for the opportunity to clarify that!
Upper Split
Figure 9 shows examples of diastases.
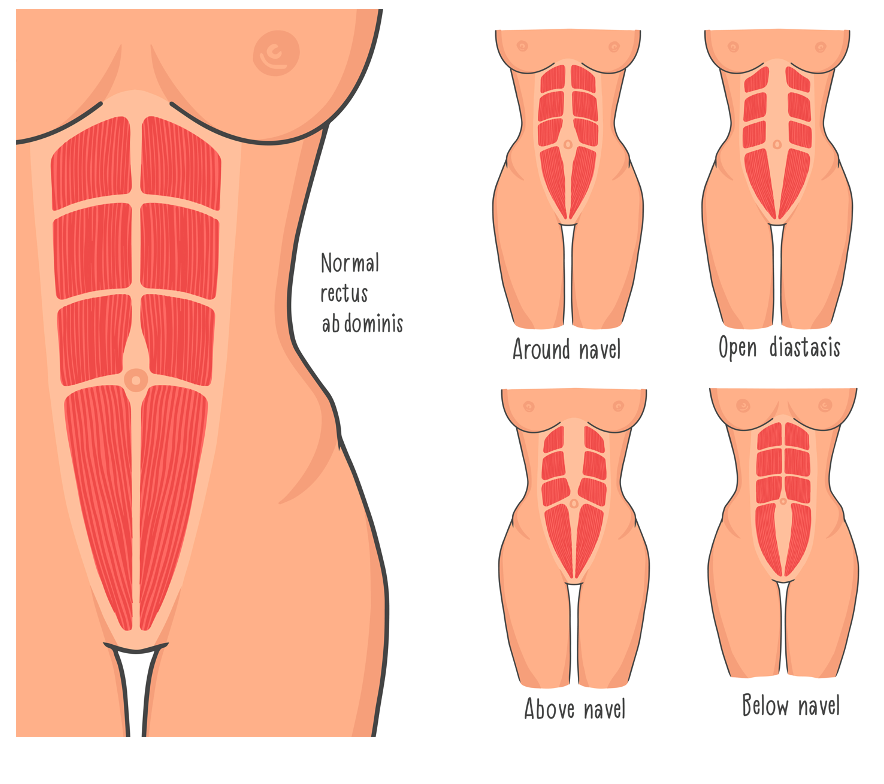
Figure 9. Examples of diastases.
For an upper diastasis, the goal is to leverage the internal obliques to help pull the separation inward and facilitate better midline pressure regulation. This begins with training the transverse abdominis, ensuring it activates correctly before progressing to more dynamic movements.
Incorporating arm and leg movements can be highly effective once the patient effectively engages the transverse abdominis. Exercises such as flies toward the floor (weighted or unweighted) or dead bug variations, particularly when performed on a half foam roller, work well to challenge control.
Other useful movements include bridging and quadruped progressions into planks with forward weight translation—similar to a bird dog but often performed with a lightweight (one or two pounds). These movements can be done forward or at a 45-degree angle, creating a Y-pattern movement to activate the internal obliques further.
The key is to engage the internal obliques without over-recruiting the external obliques, so careful observation and cueing may be necessary. Another critical factor is breathing control—patients may unconsciously attempt to freeze the diaphragm during these movements. Ensuring continued diaphragmatic movement is essential for proper intra-abdominal pressure management.
These strategies are specifically for cases where the widest separation occurs near the rib cage, requiring a more tailored approach to re-establishing core control.
Lower Split
For a lower split, we're again focusing on transfer subdominis. And then what we're trying to do is get again those internal obliques and those spine muscles integrated. I like to work in a variety of positions.
This tandem tall kneeling position in Figure 10 is my favorite.

Figure 10. Tandem tall kneeling position.
Tandem tall kneeling is one of the most effective core training positions because it eliminates the ability to use compensatory strategies to maintain balance. The difficulty increases as the front leg moves forward, making it a progressive and adaptable exercise.
What I love about this position is that you cannot substitute—if your core isn’t engaged correctly, you will lose balance. It’s fascinating to see how even very fit, high-level athletes struggle to hold this position without relying on compensatory movements. Because it forces true core activation, it’s a fantastic tool for general core training, not just diastasis. The best part is that it does not strain the linea alba excessively, making it a safe and effective choice for diastasis rehab.
Once a patient can hold the position, you can begin incorporating additional movements to further challenge them. Some effective progressions include chopping motions, PNF patterns, rotational exercises (with or without weight), and upper extremity movements. There’s a lot of room for creativity here, making it an excellent exercise for adapting to different needs.
Quadruped is another great position for core training, as it reinforces stability and control. Additionally, supine exercises like marches and bridging remain effective options, particularly in the early stages of rehabilitation.
A great question came up about modifications for lower-functioning individuals who may struggle with tandem tall kneeling. In these cases, a staggered stance can be used as an alternative. It provides a similar challenge to core stability but in a more accessible position. The further apart the feet are, the easier it is; as the patient progresses, you can work toward bringing them closer together to increase difficulty.
Another question asked whether tandem tall kneeling is beneficial even if the patient does not have diastasis. The answer is absolutely. This position is one of my go-to exercises across various patient populations because it simultaneously challenges core motor control, stability, and anticipatory movement. Additionally, it’s a great home exercise because it’s impossible to cheat—something that is rare in core training, as many people are adept at finding ways to compensate.
Case Study
This case involved a 44-year-old woman working as a patient service representative who had been dealing with chronic SI joint dysfunction for the past eight years. There was no clear mechanism of injury, and despite multiple rounds of physical therapy and chiropractic care, she never experienced lasting relief. Her pain was worse with standing, lifting, and transitioning to sitting after prolonged periods of either sitting or lying down. She did not engage in regular exercise, though she occasionally went on walks. Her medical history included two cesarean deliveries, with her children now fifteen and thirteen years old.
During the initial evaluation, I explored several aspects of her history to gain a better understanding of her core function and motor control. I wanted to know whether she had ever been evaluated for diastasis recti, if she had experienced significant weight changes, and whether she had any bowel or bladder symptoms that might indicate pelvic floor involvement. Given her history of C-sections, I was also interested in how she had healed from surgery and whether she had received any treatment for scar adhesions. It was important to understand what exercises and interventions had been attempted in the past, whether they had been effective, and if she had noticed any changes in her symptoms in relation to her menstrual cycle. Screening for referred pain was also a priority, as her symptoms could potentially be influenced by lumbar or hip involvement.
The objective findings confirmed several key issues. She demonstrated a moderate Trendelenburg gait pattern and had significant hypomobility in both her lumbar spine and pelvis. Her thoracic spine was also quite restricted, while her sacrum was hypermobile. She presented with a pronounced chest breathing pattern, which is a common finding in individuals with core dysfunction. Her active straight leg raise test was positive for anterior force closure, suggesting inadequate activation of her transverse abdominis and anterior core muscles. Single-leg stance was particularly challenging for her, which was notable given her age and lack of any major neurological condition. Upon assessing for diastasis recti, I found a three-finger-wide separation suprapubically and a two-finger-wide separation infra-umbilically, both measuring two knuckles deep. Additionally, she had very poor proprioceptive awareness of her pelvic floor and transverse abdominis, struggling to activate either on command.
The treatment plan focused on restoring mobility, improving core control, and addressing long-standing compensation patterns. Diaphragmatic breathing retraining was essential to shift her away from chest-dominant breathing and establish proper intra-abdominal pressure control. Since she had difficulty activating her pelvic floor and transverse abdominis, we worked on proprioceptive awareness using both manual cueing and real-time ultrasound biofeedback. Kinesio taping was introduced early in her program to assist with proprioceptive awareness and provide gentle support for her mild diastasis recti. Manual therapy played a crucial role, particularly in addressing scar adhesions and improving mobility in her thoracic and lumbar spine. High-velocity, low-amplitude thrust techniques were used to restore motion, especially in her thoracic spine, which in turn supported her ability to breathe more effectively with her diaphragm.
As she gained awareness and control over her deep core musculature, we progressed into early movement exercises. One of the first movement-based exercises was a segmental bridge, also known as a Pilates bridge, where she learned to articulate her spine one vertebra at a time. Pelvic clocks and rotational movements were introduced both in supine and on a stability ball to improve motor control. Strengthening work included clamshell exercises for lateral hip and pelvic stability, as well as single-leg stance training to reinforce balance and coordination. Given her history of SI joint dysfunction, we used muscle energy techniques, including the pelvic shotgun maneuver, to improve SI joint stability. To reintroduce functional movement, we started with unloaded squatting using a power tower to provide external support before progressing to bodyweight squats. Initially, she practiced inclined planks against a wall before gradually working toward full planks.
Higher-level functional training included tandem tall kneeling, an exercise that challenges core stability and eliminates compensatory movement patterns. This was particularly effective in helping her regain control of her core without reverting to inefficient strategies. As she became more confident, we incorporated stepping exercises and additional ball work to encourage dynamic stability. Throughout the process, movement was continually adjusted to ensure proper core engagement and to prevent breath holding, excessive lumbar lordosis, or other compensations that could indicate difficulty managing intra-abdominal pressure.
Throughout twelve sessions across eight weeks, she made remarkable progress. During the first four weeks, she attended therapy twice per week, followed by once-weekly sessions for the remaining four weeks. By the end of her treatment, she no longer experienced pain during daily activities or at work. She incorporated daily walking into her routine and independently maintained a ten-minute core-focused exercise program. She was also excited about the possibility of joining a gym and participating in group exercise classes, which she had not previously considered due to her chronic pain.
Her diastasis recti showed significant improvement. While the suprapubic separation remained two fingers wide and the infra-umbilical separation was reduced to one finger, the most meaningful change was in depth. What had initially been two knuckles deep had reduced to only half a knuckle, indicating improved midline force transfer and control of intra-abdominal pressure. Additionally, her gait normalized, demonstrating improved strength and stability.
This case exemplified the importance of comprehensive core retraining, going beyond isolated strength exercises to incorporate breathing, proprioception, and motor control. The combination of mobility work, core activation, and functional movement progression allowed her to achieve lasting improvements, demonstrating how addressing the entire system rather than isolated impairments can lead to meaningful change.
Summary
I hope this information is helpful to you. Let's move to the questions.
Questions and Answers
How does foot positioning impact balance exercises?
A wider base of support makes movement easier when using a staggered stance instead of tandem or tall kneeling. I start patients with their feet reasonably far apart and gradually move them closer together, working toward a heel-to-toe stance. Some patients may never achieve a full heel-to-toe position, and that’s okay—the goal is to challenge them at their functional level.
How can we avoid underdosing exercise for geriatric patients?
As a profession, we often underestimate the capacity of geriatric patients. We need to ensure that we are challenging them enough to create meaningful change while still maintaining safety.
Any suggestions for modifying exercises for males with protruding abdomens?
If a patient experiences "tenting" (where the abdominal muscles push outward instead of engaging properly), it indicates poor intra-abdominal pressure control. Here are some modification strategies:
- Cue the movement: Instruct the patient to exhale purposefully while lifting their leg and inhale while lowering it.
- Modify the range of motion: Instead of lifting the entire foot off the mat, have the patient lift onto their toes first, then progress.
- Adjust positioning: Try having the patient perform the movement while lying on their side to reduce gravitational load.
- Provide assistance: Use your hand to help guide the movement while reinforcing proper breathing and engagement cues.
- Progress gradually: As the patient gains control, work towards independent execution of the movement.
How would someone know if they have diastasis post-pregnancy? Do physicians diagnose it?
Some physicians test for and diagnose diastasis, but it is rare. I usually detect it when evaluating patients, especially those with low back pain. It is common post-pregnancy but can also occur in men, often as a precursor to a hernia. Signs include a persistent lower belly pooch and a visible "mountain" or peak forming in the middle of the abs when sitting up. These indicators warrant further testing.
What advice do you have for patients who hesitate to do exercises due to pelvic organ prolapse and anxiety about worsening their condition?
First, I explore their specific concerns—whether they’ve felt worsening symptoms with movement, read about risks, or have general anxiety. I use a balloon as a visual aid to explain intra-abdominal pressure and how imbalances can stress the pelvic floor. Exercises aim to redistribute that pressure, improving symptoms rather than worsening them.
What is the general frequency of exercises per session to maximize benefits?
It depends on the patient. I prefer multiple small sets throughout the day rather than one large session for proprioception and endurance. I often tie exercises to daily activities, such as diaphragmatic breathing during breastfeeding or core activations while changing diapers. For strength training, I incorporate core engagement into existing workouts.
Does kinesiology tape help reshape muscles?
No, it does not reshape muscles. Kinesiology tape acts as a proprioceptive aid, helping the brain become more aware of that body area, which may lead to better movement patterns and function.
Can pelvic floor exercises help with continence after catheter removal, or is bladder retraining with a toileting schedule more beneficial?
Both. Pelvic floor exercises help, but like any neuromuscular retraining, they take time. Bladder retraining and a toileting schedule should be used for the best results.
How do you know if a reset was successful using manual techniques or mats?
Check for improved movement. If the movement does not look better, another approach may be needed.
Should women wait to fix diastasis until they are done having children?
Addressing diastasis early improves comfort in future pregnancies and may reduce the severity or recurrence of diastasis in subsequent pregnancies.
Can patients with a hernia benefit from these treatment techniques?
Yes. A diastasis is a type of hernia, and these exercises can benefit any condition involving pressure imbalances.
Can you provide a list of diagnoses that benefit from core retraining?
The improved core function can benefit nearly any diagnosis, so there isn’t a definitive list. Core retraining enhances movement and stability, benefiting a wide range of conditions.
Closing Remarks
Thank you all for your great questions! Since I don’t see any more, let’s move on to a case study and do some troubleshooting together. Thank you for your time. My email is in the slide deck—feel free to reach out with questions or patient cases for discussion.
References
Please refer to the additional handout.
Citation
Stone, J. (2025). Optimizing core retraining, part 2. OccupationalTherapy.com, Article 5782. Available at www.occupationaltherapy.com
